Manual - Dockerizing the UGS Tool web application
Dockerizing a web application makes it easy to move it across systems, just wrap it inside a Docker image and run it in a container.
Docker is a system to create images which can then be run in containers. You can think of docker images as super lightweight Virtual Machines that can be run on many platforms (in this image containers are running VMs). Once you build a docker image and run it somewhere you will get the same thing running everywhere. Once we manage to build a Docker image locally that we can run as a container successfully we know that it will also run on AWS, GCP, Portainer or whatever else a company might be using.
In this manual the dockerizing of the UGS Tool web application is explained. The application consists of frontend and backend. The front-end has been developed using HTML, CSS and javascript/jQuery. The back-end has been developed using Nodejs. SQLite database to store the data that is located in the back-end. Before we start, make sure Docker is installed on your machine. This can be download here: https://www.docker.com/products/docker-desktop
Create a Dockerfile - Backend
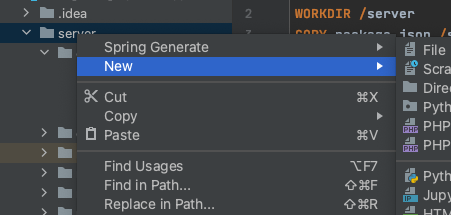
First, open the code of the web application in an IDE of choice, I am using InteliJ IDEA for this. Then we need a Dockerfile. In this manual we will start with dockerizing the backend. (Make sure the backend server of your application is running). Create a Dockerfile by right click on your server folder, click on ‘new file’ and type Dockerfile.
And rename this to Dockerfile, see example:
![]()
The Dockerfile - backend
Open the Dockerfile. Within this file the following information is specified:
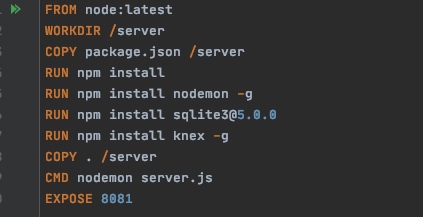
FROM: Which node version the application is using.
WORKDIR: To create a directory to hold the application code inside the image, this will be the working directory for your application.
COPY: This is used to copy the files/node package/dependencies your application needs.*
RUN: This is to install your app dependencies using the npm binary.
CMD: define the command to run your app using CMD which defines your runtime. Here we will use nodemon server.js to start the server.**
EXPOSE: The app binds to port 8081 (in this situation, but can vary) so the EXPOSE instruction is used to have it mapped by the docker daemon.
*If package.json file is not present yet, follow the steps of ‘Create the Node.js app’ at: https://nodejs.org/en/docs/guides/nodejs-docker-webapp/
** To create server.js follow the steps of ‘Create the Node.js app’ at: https://nodejs.org/en/docs/guides/nodejs-docker-webapp/
Building the image
Go to the directory that has the Dockerfile (In the terminal type ls and cd to navigate to the directory of the Dockerfile) then run the following command to build the Docker image:
| docker build -t ugs-back-end . |
The -t flag lets you tag your image so it's easier to find later using the docker images command. The . in the end means copy all in from the same directory that we’re in.
To check if the image has been created, use the following command:
| docker images |
Run the image
Running your image with the following command. The -p flag redirects a public port to a private port inside the container. Run the image you previously built, see example:
docker run -p 8081:8082 --name back-end ugs-back-end
To publish a port for our container, the --publish flag (-p for short) is used on the docker run command. The format of the --publish command is [host port]:[container port]. So if we wanted to expose port 8000 inside the container to port 3000 outside the container, we would pass 3000:8000 to the --publish flag. Start the container and expose port 8000 to port 8000 on the host.
Source: https://docs.docker.com/language/nodejs/run-containers/
As seen above, in this application it is specified as 8081:8082. Docker mapped the 8082 port inside of the container to the port 8081 on the machine.
To test the application, get the port of your app that Docker mapped, by using this command:
docker ps
Create a Dockerfile - Frontend
Now we can dockerize the frontend. Create a Dockerfile by right click on your front end (scr file) folder, click on ‘new file’ and type Dockerfile.
![]()
And rename this to Dockerfile, see example:
![]()
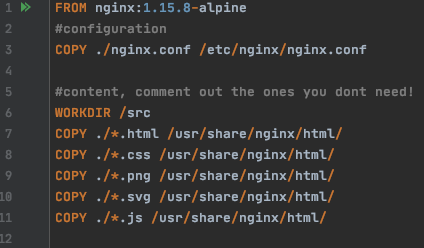
The Dockerfile - frontend
Open the Dockerfile. Within this file the following information is specified:
What’s nginx?
Nginx (pronounced "engine-x") is an open source reverse proxy server for HTTP, HTTPS, SMTP, POP3, and IMAP protocols, as well as a load balancer, HTTP cache, and a web server (origin server).
Source: https://hub.docker.com/_/nginx
FROM: This will pull the nginx:1.15.8-alpine image to our local machine and then build our custom image on top of it.
WORKDIR: To create a directory to hold the application code inside the image, this will be the working directory for your application.
COPY: To copy the ./nginx.conf into the /etc/nginx/nginx.conf directory.
COPY: To copy all the .html/.css/.png/.svg/.js file into the /usr/share/nginx/html directory inside the container overwriting the default index.html file provided by nginx:1.15.8-alpine image.
Creating nginx.conf
If you want to run a static website you need to create a nginx.conf file. This file you can copy it as it is, but make sure that all your files are in the /usr/share/nginx/html/ directory, that is shown in the Dockerfile, we’ve copied all htm, css, javascript etc into the /usr/share/nginx/html/
Sure you can copy them the way you want, but you need then to configure your nginx.conf file properly as it fits the way you copied your files in Dockerfile. Last thing is to indicate which file you want to get retrieved once your server is started, that is done by indicating which file you want in the location index scope. In this case we’re setting up the map.html as an index file. The source code is given below:
| user nginx; worker_processes 1; error_log /var/log/nginx/error.log warn; pid /var/run/nginx.pid; events { worker_connections 1024; } http { include /etc/nginx/mime.types; default_type application/octet-stream; log_format main '$remote_addr - $remote_user [$time_local] "$request" ' '$status $body_bytes_sent "$http_referer" ' '"$http_user_agent" "$http_x_forwarded_for"'; access_log /var/log/nginx/access.log main; server { listen 80; location = /status { access_log off; default_type text/plain; add_header Content-Type text/plain; return 200 "alive"; } location / { gzip off; root /usr/share/nginx/html/; index map.html; } location ~* \.(js|jpg|png|css|svg)$ { root /usr/share/nginx/html/; } } sendfile on; keepalive_timeout 65; } |
Building the image
Go to the directory that has the Dockerfile (In the terminal type ls and cd to navigate to the directory of the Dockerfile) then run the following command to build the Docker image:
| docker build -t ugs-front-end . |
Run the image
Running your image with the following command. The -p flag redirects a public port to a private port inside the container. Run the image you previously built, see example:
| docker run -it -p 8081:80 --name front-end ugs-front-end |
Extra Docker commands
Remove an image
To remove an image, the following command can be used, The -f flag means force:
| docker rmi -f (image id) |
Save Docker image as “.tar” file
| docker save -o (the tar file name.tar) (image name/directory) |
Load Docker image
To load a docker image from a tar file:
| docker load -i (file.tar) |
If there is already a container, by using this command we can run the container
To start a container
| docker start (container name/ container id) |
To stop a container
| docker stop (container name/ container id) |